Data Sources
Data Pipeline Studio supports a variety of data sources that can be used for data ingestion. Each data source has specific configuration requirements. The section below lists the various types of data sources and their configuration details. Click a data source to view the details.
-
Click the Salesforce node.
-
Click the pencil icon to edit the name of the Salesforce node. The node appears in the pipeline with the provided name.
-
In the Datastore drop down, select a configured Salesforce instance.
-
Select one or more objects and click Save.
-
Click the ServiceNow node.
-
Click the pencil icon to edit the name of the ServiceNow node. The node appears in the pipeline with the provided name.
-
In the Datastore drop down, select a configured ServiceNow instance.
-
Select one or more objects and click Save.
-
Click the CSV node.
-
Depending on the type of datastore that you select, provide the following information:
 New Datastore
-
Browse to locate the CSV file.
-
Select the storage type. This is where the data from the CSV will be stored.
-
DBFS - Databricks File System (This is the default option.)
-
Select the configured instance from the dropdown list.
-
Upload File Folder Path - Select a folder and click Upload.
-
Select a delimiter and enable Header.
-
-
Amazon S3
-
Select the configured instance from the dropdown list.
-
Upload File Folder Path - Click Add Folder Path. Do one of the following:
-
Click the radio button to select a folder.
-
Click a folder and then select a sub-folder. Click Select.
-
-
Click Upload.
-
Select a delimiter and enable Header.
-
-
 Data Ingestion Catalog
-
Select a Catalog.
-
Select a Catalog Schema.
-
Select the Tables from the selected schema. If the source schema changes, then you must run the data crawler and create a new catalog to fetch the latest schema.
-
-
Click Save.
-
Click the MS Excel node.
-
Depending on the type of datastore that you select, provide the following information:
 New Datastore
-
DBFS - Databricks File System (This is the default option.)
-
Select the configured instance from the dropdown list.
-
Upload File Folder Path - Select a folder and click Upload.
-
Select a delimiter and enable Header.
-
-
Amazon S3
-
Select the configured instance from the dropdown list.
-
Upload File Folder Path - Click Add Folder Path. Do one of he following:
-
Click the radio button to select a folder.
-
Click a folder and then select a sub-folder. Click Select.
-
-
Click Upload.
-
Select a delimiter and enable Header.
-
 Data Ingestion Catalog
-
Select a Catalog.
-
Select a Catalog Schema.
-
Select the Tables from the selected schema. If the source schema changes, then you must run the data crawler and create a new catalog to fetch the latest schema.
-
Click Save.
-
-
Click the Parquet node.
-
Depending on the type of datastore that you select, provide the following information:
 New Datastore
-
DBFS - Databricks File System (This is the default option.)
-
Select the configured instance from the dropdown list.
-
Upload File Folder Path - Select a folder and click Upload.
-
Select a delimiter and enable Header.
-
-
Amazon S3
-
Select the configured instance from the dropdown list.
-
Upload File Folder Path - Click Add Folder Path. Do one of he following:
-
Click a radio button to select a folder.
-
Click a folder and then click a radio button to select a sub-folder. Click Select.
-
-
Click Upload.
-
Select a delimiter and enable Header.
-
 Data Ingestion Catalog
-
Select a Catalog.
-
Select a Catalog Schema.
-
Select the Tables from the selected schema. If the source schema changes, then you must run the data crawler and create a new catalog to fetch the latest schema.
-
Click Save.
-
FTP is a data file server. To use FTP as a data source in DPS, you must configure it through Configuration > Platform Setup > Cloud Platform Tools and Technologies. Once that is done, you can configure a node with FTP as a data source.
-
Click the FTP node.
-
Depending on the type of datastore that you select, provide the following information:
 Configured Datastore
-
Select a datastore from the list of configured FTP servers.
-
Select Path - Click Browse and do one of the following:
-
Click a radio button to select a folder and then click Select.
-
Click a folder and then click a radio button to select a sub-folder. Click Select.

Note:
The files in the selected folders must have the same schema, else the job run will fail.
-
-
Select the required file format from the following options:
-
csv
-
json
-
parquet
-
xlsx
-
xls
-
gz
-
gzip
-
zip
-
other
-
-
To select the required files, do one of the following:
-
Select File - choose this option to select the required file.
-
Click Add File and select the required file, then click Select.
-
Select the delimiter.
-
Enable Header if you want the data to include a header.
-
Click Save.
-
-
Select Filter - choose this option to filter the required files.
-
Files to include - provide a list of files that you want to include from the source. This step is optional
-
Files to exclude - provide a list of files that you want to exclude from the source. This step is optional.

Note:
The selected files must have the same schema, else the job run will fail.
-
Select the delimiter.
-
Enable Header if you want the data to include a header.
-
Click Save.
-
-
-
Select New Datastore and provide the required information.
SFTP is a data file server. To use SFTP as a data source in DPS, you must configure it through Configuration > Platform Setup > Cloud Platform Tools and Technologies. Once that is done, you can configure a node with SFTP as a data source. Using SFTP as a data source you can ingest data either into an S3 data lake or a Snowflake data lake depending on your usecase.
Ingesting Data from SFTP into a Snowflake Data Lake
-
Click the SFTP node.
-
Depending on the type of datastore that you select, provide the following information:
 Configured Datastore
-
Select a datastore from the list of configured FTP servers.
-
Select Path - Click Browse and do one of the following:
-
Click a radio button to select a folder.
-
Click a folder and then click a radio button to select a sub-folder. Click Select.
When you select a folder, all the files in that folder are used for data ingestion. If you want to use specific files, then use the Select File or Select Filter options mentioned in step 4.

Note:
The files in the selected folders must have the same schema, else the job run will fail.
-
-
Select the required file format from the following options:
-
csv
-
json
-
parquet
-
xlsx
-
xls
-
gz
-
gzip
-
zip
-
other
-
-
To select specific files from the folder, choose one of the following options:
-
Select File - Click Add File, browse to the file and click the radio button and click Select.
-
Select the delimiter.
-
Enable Header if you want the data to include a header.
-
-
Select Filter
-
Files to include - provide a list of files to be included. This is optional.
-
Files to exclude - provide a list of files to be excluded. This is optional.

Note:
The selected files must have the same schema, else the job run will fail.
-
-
-
Click Save.
 New Datastore
Select New Datastore and provide the required information.
-
To use Amazon S3 as a data source, you must configure it through Configuration > Platform Setup > Cloud Platform Tools and Technologies. Once that is done, you can configure an Amazon S3 node as a data source.
-
Click the Amazon S3 node.
-
Click the pencil icon to edit the name of the Amazon S3 node. The node appears in the pipeline with the provided name.
-
Select a datastore from the dropdown.
-
Select Path - Click Browse and do one of the following:
-
Click a radio button to select a folder.
-
Click a folder and then click a radio button to select a sub-folder. Click Select.
When you select a folder, all the files in that folder are used for data ingestion. If you want to use selected files, then use the Select File or Select Filter options mentioned in step 6.

Note:
The files in the selected folders must have the same schema, else the job run will fail.
-
-
Select the required file format from the following options:
-
csv
-
json
-
parquet
-
xls
-
xlsx
-
Delta table
-
gz
-
gzip
-
zip
-
other
-
-
Select one of the following options:
-
Select File - Click Add File, browse to the file and click the radio button and click Select.
-
Select the delimiter.
-
Enable Header if you want the data to include a header.
-
-
Select Filter
-
Files to include - provide a list of files to be included. This is optional.
-
Files to exclude - provide a list of files to be excluded. This is optional.

Note:
The selected files must have the same schema, else the job run will fail.
-
-
-
Click Save.
To use Azure Data Lake as a data source, you must configure it through Configuration > Platform Setup > Cloud Platform Tools and Technologies > Databases and Data Warehouses. Once that is done, you can configure an Azure Data Lake node as a data source.
-
Click the Azure Data Lake node.
-
Click the pencil icon to edit the name of the Azure Data Lake node. The node appears in the pipeline with the provided name.
-
Select a datastore from the dropdown.
-
Select Path - Click Browse and do one of the following:
-
Click a radio button to select a folder.
-
Click a folder and then click a radio button to select a sub-folder. Click Select.
When you select a folder, all the files in that folder are used for data ingestion. If you want to use selected files, then use the Select File or Select Filter options mentioned in step 6.

Note:
The files in the selected folders must have the same schema, else the job run will fail.
-
-
Select the required file format from the following options:
-
Regular
-
CSV
-
JSON
-
Parquet
-
XLS
-
XLSX
-
-
Table Format
-
Delta Format
-
-
Compressed
-
gz
-
gzip
-
zip
-
-
-
Select one of the following options:
-
Select File - Click Add File, browse to the file, click the radio button and click Select.
-
Select the delimiter.
-
Enable Header if you want the data to include a header.
-
-
Select Filter
-
Files to include - provide a list of files to be included. This is optional.
-
Files to exclude - provide a list of files to be excluded. This is optional.

Note:
The selected files must have the same schema, else the job run will fail.
-
-
-
Click Save.
-
Select a Catalog.
-
Select a Catalog Schema.
-
Select the Tables from the selected schema. If the source schema changes, then you must run the data crawler and create a new catalog to fetch the latest schema.
-
Click Save.
-
Click the REST API node.
-
Provide the following information to configure the REST API node.
Field Description Method Select the GET or POST method. URL Provide the URL for the API. Response Format Select the format in which you want the API response, choose between JSON and XML. Connect using Calibo Accelerate Orchestrator Agent If you enable the Connect using Calibo Accelerate Orchestrator Agent option, provide the following information:
-
Select AWS Secrets Manager as the Identity Security Provider.
-
Provide the Key, Secret Name, and Secret Key.
Request Header Provide the key and value for Request Header. (This is optional). Query Parameters Add any query parameters according to your requirement for the following:
-
Initial Load
-
Incremental Load
-
Pagination
Use SSL Enable this option to upload an SSL certificate. Select one of the following methods:
-
Use Existing
-
Select Storage - Select one of the following options:
-
Databricks File System (DBFS)
-
Amazon S3
-
-
Select Configured Datastore - select a datastore from the dropdown list.
-
-
Upload New - Click Browse this computer to upload the SSL file. The supported file types are
Request Body (Optional) Provide the Request Body in JSON format. Data Root (Optional) Under Data Root add the various data nodes in your REST API output. The data nodes can be directly mapped to target files in a Databricks transformation job.
Use Custom Proxy Select the proxy type:
-
HTTP
-
HTTPS
Provide the following information:
-
Proxy Server
-
Port
-
Proxy Auth - Enable this option and provide the following information:
-
Username
-
Password
-
-
Show Preview
-
-
Click Save.
-
Click the Microsoft SQL Server node. Do one of the following:
-
Select Configured Datastore. Choose a datastore from the list of configured datastores. Select one of the following options:
Select a table from the database from which you want data to be fetched. Click Add.
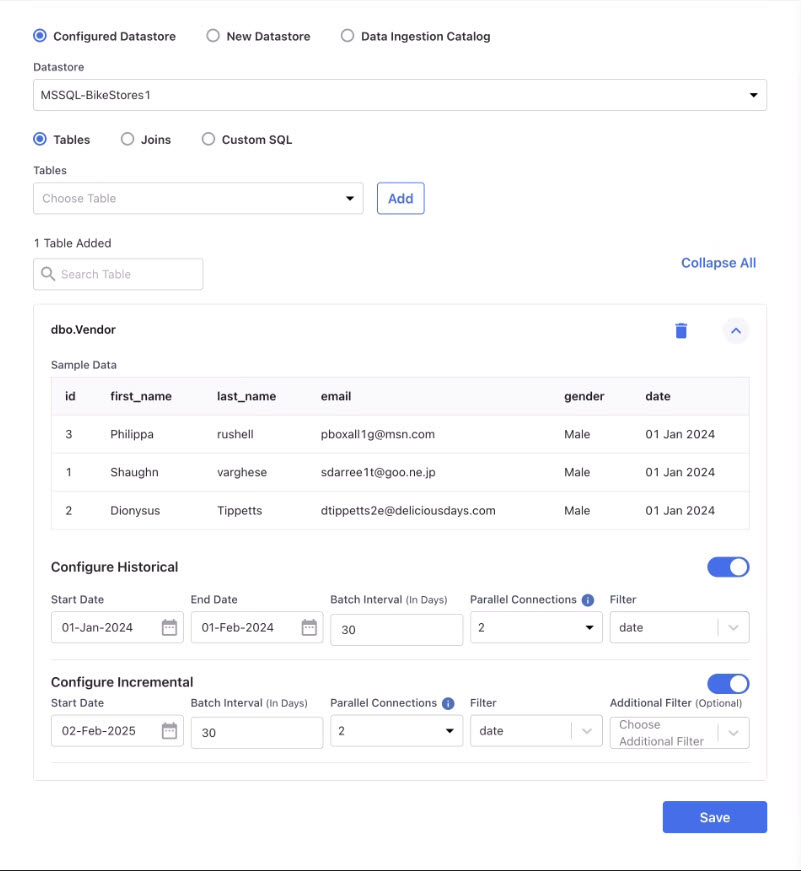

-
Click Expand All. The columns of the tables are displayed. You can filter the data for the columns of the table.
-
Filters - apply filter for a certain column to filter the data that is ingested from the source. Do the following:
-
Click the filter icon of the column for which you want to filter data.
-
 Select a condition:
< Records that have less than the specified value are filtered. Provide the value. <= Records that have less than or equal to the specified value are filtered. Provide the value. == Records that have exactly the specified value are filtered. Provide the value. != Records that do not have the specified value are filtered. Provide the value. >= Records that have greater than or equal to the specified value are filtered. Provide the value. > Records that have greater than the specified value are filtered. Provide the value. In Records with values that match the specified list of values are filtered. Provide a comma separated list of values. Not in Records with values that do not match with the specified list of values are filtered. Provide a comma separated list of values. Between Records with values that match the specified range of values are filtered. Provide the start value and end value in the provided fields. Like Records that match the specified pattern are filtered. Provide the alphabets or numbers to specify the pattern. -
Click Add to add the condition for the filter.
-
Click Preview Data to view a few sample records of filtered data.
-
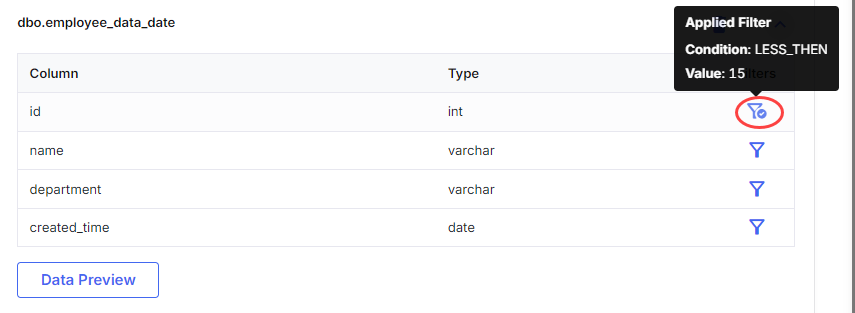
Click Save. Notice that the column for which you applied a filter shows a tick mark on the filter icon. Hovering over the tick mark displays details of the applied filters.
-
-
Configure Historical - If your table contains historical data for a specific period, you can enable this option to fetch data for a specific date range. Do the following:
-
Select the Start Date and End Date to specify the period for which you want the data to be fetched.
-
Batch Interval (In Days) - Specify the number of days for which the data will be fetched in each batch.
-
Parallel Connections - Specify the number of connections that you want running concurrently to fetch the data.
-
Filter - Select the column for which you want to apply the filter.
-
-
Configure Incremental - Incremental load is used to continuously fetch only the latest changes from a database table—making data ingestion faster, lighter, and more efficient. This feature is especially useful for handling large datasets that are updated frequently.
If you want to continue fetching data incrementally, you can enable this option.
-
Start Date - Specify the date from which you want to fetch data incrementally.
-
Batch Interval (In Days) - While the Batch Interval field is visible, it is not used in data ingestion since incremental loads typically involve smaller daily or minute-based deltas, making batch slicing unnecessary.
-
Parallel Connections - Specify the number of connections that you want running concurrently to fetch the data.
-
Filter - Specify the name of the column for which you want to apply the filter.
-
Additional Filter - Specify any additional column for which you want to fetch the data.
Incremental Load Behavior Based on Column Type in the Selected Table
Here is a breakdown of how incremental load works, how the platform determines what data to ingest, and what to expect when configuring it.
-
If the Source Table Has a Date Column
Calibo's Data Pipeline Studio uses T–1 logic and ingests data up to one day before the current date available in the date column.
For example, if the maximum value in the order_date column is 2025-05-10, the platform only fetches rows where order_date is less than 2025-05-10, that is, up to 2025-05-09.
Benefits
-
Avoids partial-day data ingestion which may lead to incomplete records.
-
Ensures consistency by only pulling data that is presumed to be fully written and closed for the day.
-
-
If the Source Table Has a Datetime Column
Calibo Data Pipeline Studio uses T–1 minute logic and ingests data up to one minute before the most recent datetime value in that column.
For example, if the maximum value in the created_at column is 2025-05-10 14:45:00, the platform fetches records where created_at is less than 2025-05-10 14:45:00, that is, up to 2025-05-10 14:44:00.
Benefits
-
Enables near-real-time ingestion without risking incomplete rows.
-
Minimizes latency between data creation and data availability in the pipeline.
-
-
When There’s No New Data (No Delta)
If no new records are detected since the last run, the system ingests the remaining unprocessed data, ensuring nothing is lost and consistency is maintained.
Benefits
This ensures reliable, complete data ingestion even when no new records are available, avoiding gaps caused by earlier partial loads.
-
Depending on whether you enable the options Configure Historical and Configure Incremental, the data is loaded as follows:
-
If neither Configure Historical nor Configure Incremental is enabled, the complete dataset is loaded into the target.
-
If you enable Configure Historical, data within the specified date range is loaded during the job run.
-
If you enable Configure Incremental, only the incremental data starting from the specified start date is loaded, and the delta column is used to track changes.
-
If both Configure Incremental and Configure Historical are enabled, during the first run, data within the specified date range is loaded. In subsequent runs, only the incremental data from the start date is loaded.
This operation combines the rows from two table references, based on join criteria.
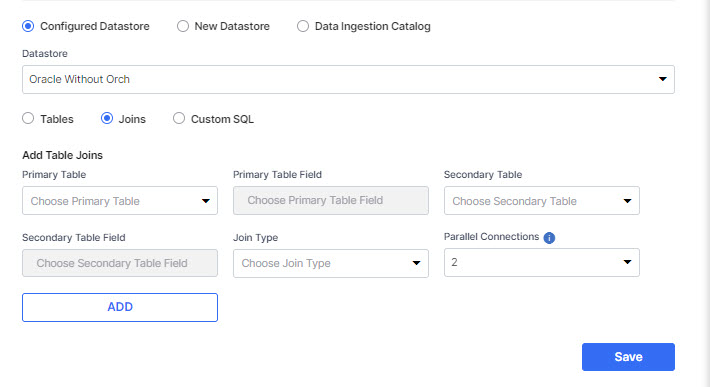
Provide the following information under Add Table Joins:
-
Primary Table - Select a primary table for the join operation.
-
Primary Table Field - Select the field from the primary table for the join operation.
-
Secondary Table - Select the secondary table for the join operation.
-
Secondary Table Field - Select the field from the secondary table for the join operation.
-
Join Type - Specify the type of join. Select from the options - inner join and outer join.
-
Parallel Connections - Specify the number of connections that you want running concurrently to fetch the data. Choose from the options - 2,4,8.
-
Click Add and then click Save.
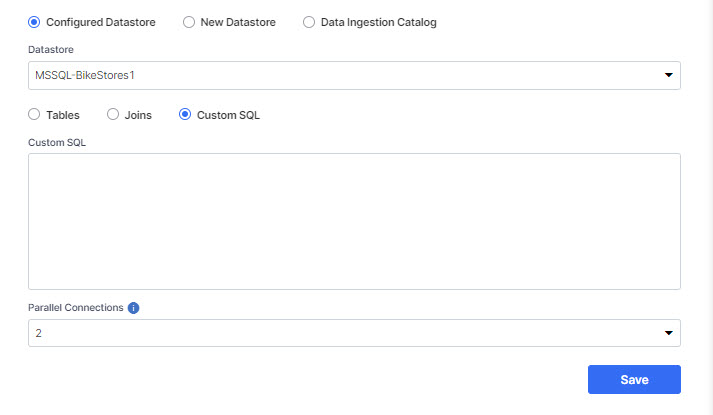
Provide the custom SQL query that you want to run on the data.
Custom SQL -
-
Provide the custom SQL query that you want to run on the data.
-
Select the number of parallel connections that you want to use to fetch the data. Choose from the options - 2,4,8.
-
Click Save.
-
Select New Datastore and provide the required information. See Configure Microsoft SQL Server Connection Details.
-
Select Data Catalog.
-
Choose the Catalog.
-
Choose the Catalog Schema.
-
Click Save.
-
For more information about Data Catalog, see Data Crawler and Data Catalog
-
Click the MySQL node.
-
Use one of the following options to add a datastore:
-
Select Configured Datastore. Choose a datastore from the list of configured datastores. Select one of the following options:
 Tables
-
Select a table from the dropdown list and click Add.


-
Click Expand All.
-
Configure Historical - If your table contains historical data for a specific period, you can enable this option to fetch data for a specific date range. Do the following:
-
Select the Start Date and End Date to specify the period for which you want the data to be fetched.
-
Batch Interval (In Days) - Specify the number of days for which the data will be fetched in each batch.
-
Parallel Connections - Specify the number of connections that you want running concurrently to fetch the data.
-
Filter - Select the column for which you want to apply the filter.
-
-
Configure Incremental - Incremental load is used to continuously fetch only the latest changes from a database table—making data ingestion faster, lighter, and more efficient. This feature is especially useful for handling large datasets that are updated frequently.
If you want to continue fetching data incrementally, you can enable this option.
-
Start Date - Specify the date from which you want to fetch data incrementally.
-
Batch Interval (In Days) - While the Batch Interval field is visible, it is not used in data ingestion since incremental loads typically involve smaller daily or minute-based deltas, making batch slicing unnecessary.
-
Parallel Connections - Specify the number of connections that you want running concurrently to fetch the data.
-
Filter - Specify the name of the column for which you want to apply the filter.
-
Additional Filter - Specify any additional column for which you want to fetch the data.
Incremental Load Behavior Based on Column Type in the Selected Table
Here is a breakdown of how incremental load works, how the platform determines what data to ingest, and what to expect when configuring it.
-
If the Source Table Has a Date Column
Calibo Data Pipeline Studio uses T–1 logic and ingests data up to one day before the latest date available in the date column.
For example, if the maximum value in the order_date column is 2025-05-10, the platform only fetches rows where order_date is less than 2025-05-10, that is, up to 2025-05-09.
Benefits
-
Avoids partial-day data ingestion which may lead to incomplete records.
-
Ensures consistency by only pulling data that is presumed to be fully written and closed for the day.
-
-
If the Source Table Has a Datetime Column
Calibo Data Pipeline Studio uses T–1 minute logic and ingests data up to one minute before the most recent datetime value in that column.
For example, if the maximum value in the created_at column is 2025-05-10 14:45:00, the platform fetches records where created_at is less than 2025-05-10 14:45:00, that is, up to 2025-05-10 14:44:00.
Benefits
-
Enables near-real-time ingestion without risking incomplete rows.
-
Minimizes latency between data creation and data availability in the pipeline.
-
-
When There’s No New Data (No Delta)
If no new records are detected since the last run, the system ingests the remaining unprocessed data, ensuring nothing is lost and consistency is maintained.
Benefits
This ensures reliable, complete data ingestion even when no new records are available, avoiding gaps caused by earlier partial loads.
-
Depending on whether you enable the options Configure Historical and Configure Incremental, the data is loaded as follows:
-
If neither Configure Historical nor Configure Incremental is enabled, the complete dataset is loaded into the target.
-
If you enable Configure Historical, data within the specified date range is loaded during the job run.
-
If you enable Configure Incremental, only the incremental data starting from the specified start date is loaded, and the delta column is used to track changes.
-
If both Configure Incremental and Configure Historical are enabled, during the first run, data within the specified date range is loaded. In subsequent runs, only the incremental data from the start date is loaded.
 Joins
Joins
This operation combines the rows from two table references, based on join criteria.

Provide the following information under Add Table Joins:
-
Primary Table - Select a primary table for the join operation.
-
Primary Table Field - Select the field from the primary table for the join operation.
-
Secondary Table - Select the secondary table for the join operation.
-
Secondary Table Field - Select the field from the secondary table for the join operation.
-
Join Type - Specify the type of join. Select from the options - inner join and outer join.
-
Parallel Connections - Specify the number of connections that you want running concurrently to fetch the data. Choose from the options - 2,4,8.
-
Click Add and then click Save.
 Custom SQL
Provide the custom SQL query that you want to run on the data.
Custom SQL - Provide the custom SQL query that you want to run on the data.

-
Parallel Connections - Select the number of parallel connections that you want to use to fetch the data. Choose from the options - 2,4,8.
-
Click Save.
-
-
Select New Datastore and provide the required information. See Configure MySQL Connection Details.
-
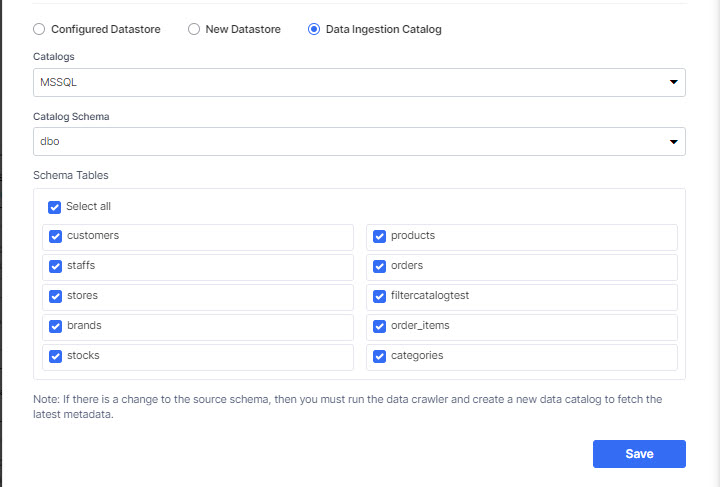
Select Data Ingestion Catalog.
-
Choose a catalog from the list of configured catalogs.
-
Choose the Catalog Schema.
-
Select the Tables from the selected schema. If the source schema changes, then you must run the data crawler and create a new catalog to fetch the latest schema.
-
Click Save.
-
-
For more information about Data Catalog, see Data Crawler and Data Catalog
-
Click the Oracle node.
-
Use one of the following options to add a datastore:
-
Select Configured Datastore. Choose a datastore from the list of configured datastores. Select one of the following options:
 Tables
Select a table from the database from which you want data to be fetched. Click Add.


-
Click Expand All.
-
Configure Historical - If your table contains historical data for a specific period, you can enable this option to fetch data for a specific date range. Do the following:
-
Select the Start Date and End Date to specify the period for which you want the data to be fetched.
-
Batch Interval (In Days) - Specify the number of days for which the data will be fetched in each batch.
-
Parallel Connections - Specify the number of connections that you want running concurrently to fetch the data. Choose from the options - 2,4,8.
-
Filter - Select the column for which you want to apply the filter.
-
-
Configure Incremental - Incremental load is used to continuously fetch only the latest changes from a database table—making data ingestion faster, lighter, and more efficient. This feature is especially useful for handling large datasets that are updated frequently.
If you want to continue fetching data incrementally, you can enable this option.
-
Start Date - Specify the date from which you want to fetch data incrementally.
-
Batch Interval (In Days) - While the Batch Interval field is visible, it is not used in data ingestion since incremental loads typically involve smaller daily or minute-based deltas, making batch slicing unnecessary.
-
Parallel Connections - Specify the number of connections that you want running concurrently to fetch the data.
-
Filter - Specify the name of the column for which you want to apply the filter.
-
Additional Filter - Specify any additional column for which you want to fetch the data.
Incremental Load Behavior Based on Column Type in the Selected Table
Here is a breakdown of how incremental load works, how the platform determines what data to ingest, and what to expect when configuring it.
-
If the Source Table Has a Date Column
Calibo Data Pipeline Studio uses T–1 logic and ingests data up to one day before the latest date available in the date column.
For example, if the maximum value in the order_date column is 2025-05-10, the platform only fetches rows where order_date is less than 2025-05-10, that is, up to 2025-05-09.
Benefits
-
Avoids partial-day data ingestion which may lead to incomplete records.
-
Ensures consistency by only pulling data that is presumed to be fully written and closed for the day.
-
-
If the Source Table Has a Datetime Column
Calibo Data Pipeline Studio uses T–1 minute logic and ingests data up to one minute before the most recent datetime value in that column.
For example, if the maximum value in the created_at column is 2025-05-10 14:45:00, the platform fetches records where created_at is less than 2025-05-10 14:45:00, that is, up to 2025-05-10 14:44:00.
Benefits
-
Enables near-real-time ingestion without risking incomplete rows.
-
Minimizes latency between data creation and data availability in the pipeline.
-
-
When There’s No New Data (No Delta)
If no new records are detected since the last run, the system ingests the remaining unprocessed data, ensuring nothing is lost and consistency is maintained.
Benefits
This ensures reliable, complete data ingestion even when no new records are available, avoiding gaps caused by earlier partial loads.
-
Depending on whether you enable the options Configure Historical and Configure Incremental, the data is loaded as follows:
-
If neither Configure Historical nor Configure Incremental is enabled, the complete dataset is loaded into the target.
-
If you enable Configure Historical, data within the specified date range is loaded during the job run.
-
If you enable Configure Incremental, only the incremental data starting from the specified start date is loaded, and the delta column is used to track changes.
-
If both Configure Incremental and Configure Historical are enabled, during the first run, data within the specified date range is loaded. In subsequent runs, only the incremental data from the start date is loaded.
 Joins
Joins
This operation combines the rows from two table references, based on join criteria.

Provide the following information under Add Table Joins:
-
Primary Table - Select a primary table for the join operation.
-
Primary Table Field - Select the field from the primary table for the join operation.
-
Secondary Table - Select the secondary table for the join operation.
-
Secondary Table Field - Select the field from the secondary table for the join operation.
-
Join Type - Specify the type of join. Select from the options - inner join and outer join.
-
Parallel Connections - Specify the number of connections that you want running concurrently to fetch the data. Choose from the options - 2,4,8.
-
Click Add and then click Save.
 Custom SQL
Provide the custom SQL query that you want to run on the data.
Custom SQL -

-
Provide the custom SQL query that you want to run on the data.
-
Select the number of parallel connections that you want to use to fetch the data. Choose from the options - 2,4,8.
-
Click Save.
-
-
Select New Datastore and provide the required information. See Configure Oracle Connection Details.
-
Select Data Ingestion Catalog.

-
Choose a catalog from the list of configured catalogs.
-
Choose the Catalog Schema.
-
Select the Tables from the selected schema. If the source schema changes, then you must run the data crawler and create a new catalog to fetch the latest schema.
-
Click Save.
-
-
For more information about Data Catalog, see Data Crawler and Data Catalog
-
Click the PostgreSQL node.
-
Use one of the following options to add a datastore:
-
Select Configured Datastore. Choose a datastore from the list of configured datastores. Select one of the following options:
 Tables
Select a table from the database from which you want data to be fetched. Click Add.


-
Click Expand All
-
Configure Historical - If your table contains historical data for a specific period, you can enable this option to fetch data for a specific date range. Do the following:
-
Select the Start Date and End Date to specify the period for which you want the data to be fetched.
-
Batch Interval (In Days) - Specify the number of days for which the data will be fetched in each batch.
-
Parallel Connections - Specify the number of connections that you want running concurrently to fetch the data.
-
Filter - Select the column for which you want to apply the filter.
-
-
Configure Incremental - Incremental load is used to continuously fetch only the latest changes from a database table—making data ingestion faster, lighter, and more efficient. This feature is especially useful for handling large datasets that are updated frequently.
If you want to continue fetching data incrementally, you can enable this option.
-
Start Date - Specify the date from which you want to fetch data incrementally.
-
Batch Interval (In Days) - While the Batch Interval field is visible, it is not used in data ingestion since incremental loads typically involve smaller daily or minute-based deltas, making batch slicing unnecessary.
-
Parallel Connections - Specify the number of connections that you want running concurrently to fetch the data.
-
Filter - Specify the name of the column for which you want to apply the filter.
-
Additional Filter - Specify any additional column for which you want to fetch the data.
Incremental Load Behavior Based on Column Type in the Selected Table
Here is a breakdown of how incremental load works, how the platform determines what data to ingest, and what to expect when configuring it.
-
If the Source Table Has a Date Column
Calibo Data Pipeline Studio uses T–1 logic and ingests data up to one day before the latest date available in the date column.
For example, if the maximum value in the order_date column is 2025-05-10, the platform only fetches rows where order_date is less than 2025-05-10, that is, up to 2025-05-09.
Benefits
-
Avoids partial-day data ingestion which may lead to incomplete records.
-
Ensures consistency by only pulling data that is presumed to be fully written and closed for the day.
-
-
If the Source Table Has a Datetime Column
Calibo Data Pipeline Studio uses T–1 minute logic and ingests data up to one minute before the most recent datetime value in that column.
For example, if the maximum value in the created_at column is 2025-05-10 14:45:00, the platform fetches records where created_at is less than 2025-05-10 14:45:00, that is, up to 2025-05-10 14:44:00.
Benefits
-
Enables near-real-time ingestion without risking incomplete rows.
-
Minimizes latency between data creation and data availability in the pipeline.
-
-
When There’s No New Data (No Delta)
If no new records are detected since the last run, the system ingests the remaining unprocessed data, ensuring nothing is lost and consistency is maintained.
Benefits
This ensures reliable, complete data ingestion even when no new records are available, avoiding gaps caused by earlier partial loads.
-
Depending on whether you enable the options Configure Historical and Configure Incremental, the data is loaded as follows:
-
If neither Configure Historical nor Configure Incremental is enabled, the complete dataset is loaded into the target.
-
If you enable Configure Historical, data within the specified date range is loaded during the job run.
-
If you enable Configure Incremental, only the incremental data starting from the specified start date is loaded, and the delta column is used to track changes.
-
If both Configure Incremental and Configure Historical are enabled, during the first run, data within the specified date range is loaded. In subsequent runs, only the incremental data from the start date is loaded.
 Joins
Joins
This operation combines the rows from two table references, based on join criteria.

Provide the following information under Add Table Joins:
-
Primary Table - Select a primary table for the join operation.
-
Primary Table Field - Select the field from the primary table for the join operation.
-
Secondary Table - Select the secondary table for the join operation.
-
Secondary Table Field - Select the field from the secondary table for the join operation.
-
Join Type - Specify the type of join. Select from the options - inner join and outer join.
-
Parallel Connections - Specify the number of connections that you want running concurrently to fetch the data. Choose from the options - 2,4,8.
-
Click Add and then click Save.
 Custom SQL
Provide the custom SQL query that you want to run on the data.
Custom SQL -

-
Provide the custom SQL query that you want to run on the data.
-
Select the number of parallel connections that you want to use to fetch the data. Choose from the options - 2,4,8.
-
Click Save.
-
-
Select New Datastore and provide the required information. See Configure PostgreSQL Connection Details .
-
Select Data Ingestion Catalog.

-
Choose a catalog from the list of configured catalogs.
-
Choose the Catalog Schema.
-
Select the Tables from the selected schema. If the source schema changes, then you must run the data crawler and create a new catalog to fetch the latest schema.
-
Click Save.
-
-
For more information about Data Catalog, see Data Crawler and Data Catalog
To use Snowflake as a data source in a data pipeline, you must create a Snowflake (RDBMS) configuration in the Databases and Data Warehouses section of Cloud Platform Tools and Technologies.
To add Snowflake as a data source in a data pipeline, do the following:
-
On the home page of Data Pipeline Studio, click + (Add New Stage), select Data Sources as stage type, provide a stage name and click Add.
-
In the newly added Data Sources stage, to add Snowflake as a data source, do the following:
-
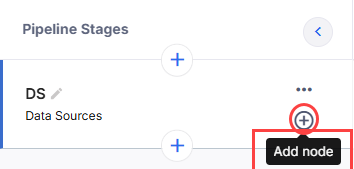
Click Add Node.
-
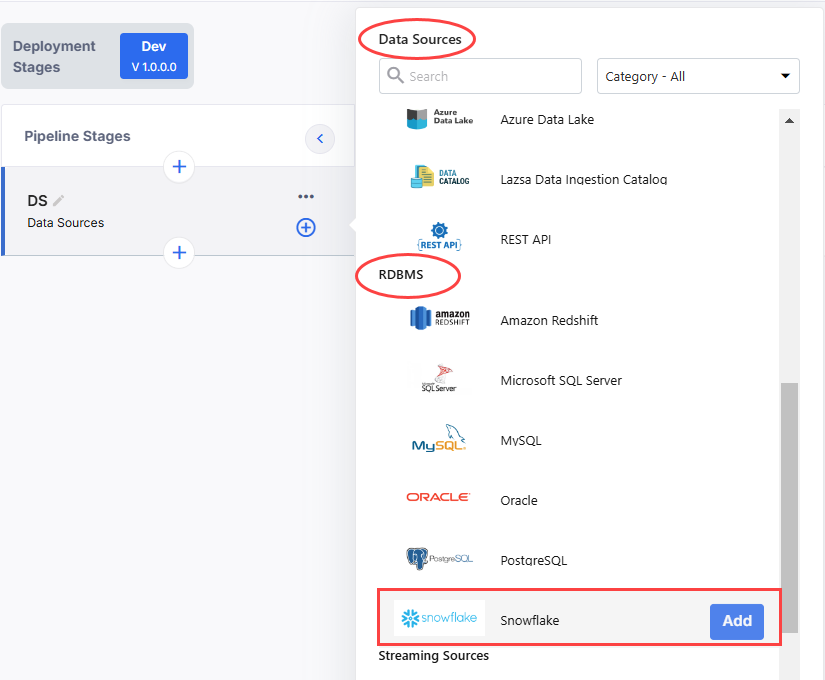
Under Data Sources, in the RDBMS section click Add against Snowflake.
-
-
Click the Snowflake node.
-
In the side drawer, click the pencil icon to edit the name of the node. Click one of the following options to add a Snowflake datastore:
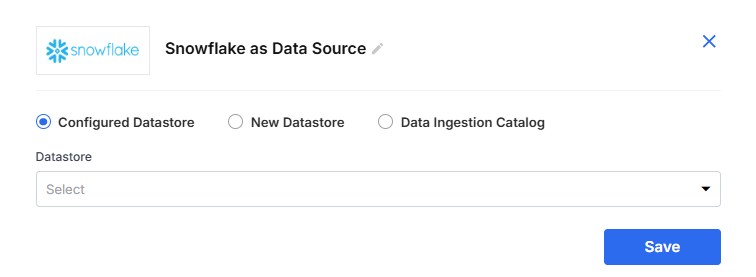
 Configured Datastore
Select this option if you have an existing Snowflake account configured as an RDBMS in the Databases and Data Warehouses section of Cloud Platform Tools and Technologies, and you want to use it as a data source in your data pipeline.
 Tables
Select a table from the database from which you want data to be fetched. Click Add.


-
Click Expand All
-
Configure Historical - If your table contains historical data for a specific period, you can enable this option to fetch data for a specific date range. Do the following:
-
Select the Start Date and End Date to specify the period for which you want the data to be fetched.
-
Batch Interval (In Days) - Specify the number of days for which the data will be fetched in each batch.
-
Parallel Connections - Specify the number of connections that you want running concurrently to fetch the data.
-
Filter - Select the column for which you want to apply the filter.
-
-
Configure Incremental - Incremental load is used to continuously fetch only the latest changes from a database table—making data ingestion faster, lighter, and more efficient. This feature is especially useful for handling large datasets that are updated frequently.
If you want to continue fetching data incrementally, you can enable this option.
-
Start Date - Specify the date from which you want to fetch data incrementally.
-
Batch Interval (In Days) - While the Batch Interval field is visible, it is not used in data ingestion since incremental loads typically involve smaller daily or minute-based deltas, making batch slicing unnecessary.
-
Parallel Connections - Specify the number of connections that you want running concurrently to fetch the data.
-
Filter - Specify the name of the column for which you want to apply the filter.
-
Additional Filter - Specify any additional column for which you want to fetch the data.
Incremental Load Behavior Based on Column Type in the Selected Table
Here is a breakdown of how incremental load works, how the platform determines what data to ingest, and what to expect when configuring it.
-
If the Source Table Has a Date Column
Calibo Data Pipeline Studio uses T–1 logic and ingests data up to one day before the latest date available in the date column.
For example, if the maximum value in the order_date column is 2025-05-10, the platform only fetches rows where order_date is less than 2025-05-10, that is, up to 2025-05-09.
Benefits
-
Avoids partial-day data ingestion which may lead to incomplete records.
-
Ensures consistency by only pulling data that is presumed to be fully written and closed for the day.
-
-
If the Source Table Has a Datetime Column
Calibo Data Pipeline Studio uses T–1 minute logic and ingests data up to one minute before the most recent datetime value in that column.
For example, if the maximum value in the created_at column is 2025-05-10 14:45:00, the platform fetches records where created_at is less than 2025-05-10 14:45:00, that is, up to 2025-05-10 14:44:00.
Benefits
-
Enables near-real-time ingestion without risking incomplete rows.
-
Minimizes latency between data creation and data availability in the pipeline.
-
-
When There’s No New Data (No Delta)
If no new records are detected since the last run, the system ingests the remaining unprocessed data, ensuring nothing is lost and consistency is maintained.
Benefits
This ensures reliable, complete data ingestion even when no new records are available, avoiding gaps caused by earlier partial loads.
-
Depending on whether you enable the options Configure Historical and Configure Incremental, the data is loaded as follows:
-
If neither Configure Historical nor Configure Incremental is enabled, the complete dataset is loaded into the target.
-
If you enable Configure Historical, data within the specified date range is loaded during the job run.
-
If you enable Configure Incremental, only the incremental data starting from the specified start date is loaded, and the delta column is used to track changes.
-
If both Configure Incremental and Configure Historical are enabled, during the first run, data within the specified date range is loaded. In subsequent runs, only the incremental data from the start date is loaded.
 Joins
Joins
This operation combines the rows from two table references, based on join criteria.

Provide the following information under Add Table Joins:
-
Primary Table - Select a primary table for the join operation.
-
Primary Table Field - Select the field from the primary table for the join operation.
-
Secondary Table - Select the secondary table for the join operation.
-
Secondary Table Field - Select the field from the secondary table for the join operation.
-
Join Type - Specify the type of join. Select from the options - inner join and outer join.
-
Parallel Connections - Specify the number of connections that you want running concurrently to fetch the data. Choose from the options - 2,4,8.
-
Click Add and then click Save.
 Custom SQL
Provide the custom SQL query that you want to run on the data.
Custom SQL -

-
Provide the custom SQL query that you want to run on the data.
-
Select the number of parallel connections that you want to use to fetch the data. Choose from the options - 2,4,8.
-
Click Save.
 New Datastore
Select this option if you want to configure a new Snowflake account as an RDBMS in the Databases and Data Warehouses section of Cloud Platform Tools and Technologies, and use it a data source in your data pipeline.
See Configure Snowflake Connection Details (as data source).
 Data Ingestion Catalog
Select this option if you have created a Snowflake data crawler and catalog and want to use it as a data source in your data pipeline.

-
Choose a catalog from the list of configured catalogs.
-
Choose the Catalog Schema.
-
Select the Tables from the selected schema. If the source schema changes, then you must run the data crawler and create a new catalog to fetch the latest schema.
-
Click Save.
For more information about creating a Snowflake data Catalog as a data source, see Data Crawler and Data Catalog.
-
-
Click the Kinesis Streaming node.
-
Do one of the following:
-
Choose Configured Datastore.
-
Select a datastore from the dropdown.
-
Click Browse this computer to upload the Kinesis schema in JSON format. Alternately, download the template and then upload the Kinesis schema in JSON format.
-
-
Choose New Datastore. See Configuring Amazon Kinesis Data Streams.
-
| What's next? Data Crawler and Data Catalog |